Tuesday, February 15, 2011

An Announcement and Link Party Features: MMBCreations & The Crafty Scientist

I really enjoyed seeing the guest room transformation by MMBCreations. I know how hard it is to get all the crafting supplies organized. I loved the pictures of the spool table and floral arrangement. Great way to set a theme!


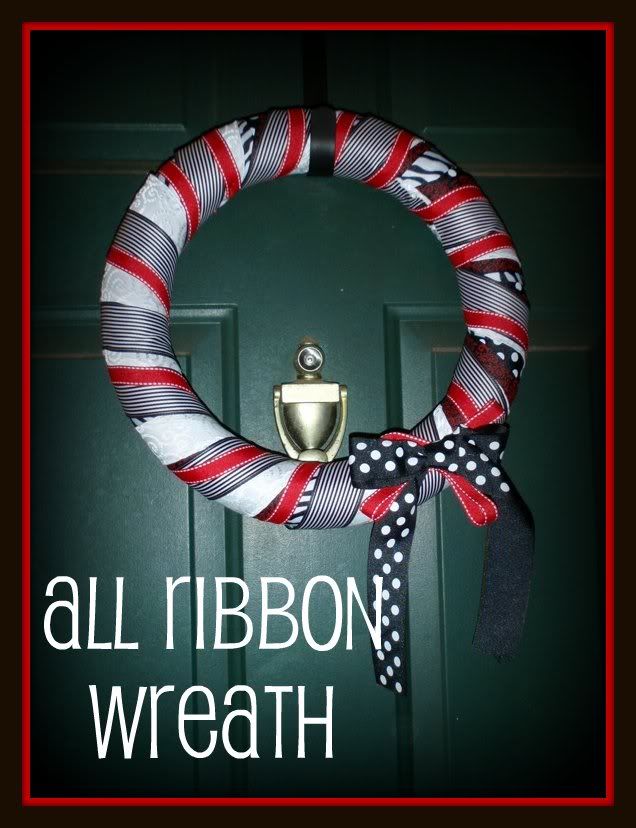
The Crafty Scientist, gave us a quick and easy way to decorate with her Ribbon Wreath. I think I will keep an eye out for clearance ribbon, now. ;)


And now for the announcement.

I love link parties, and try to get in on the ones I know about. However, 2-4 entries a link party does not make. So I will not be holding them any longer. Perhaps I will bring it back at a later date when I have more followers or participation on the blog.

Suzy's Artsy Craftsy Sitcom has an extensive list of link parties through out the week, so please take a look.

Also, my blogging will not be as frequent as it has been. It takes a large chunk of my time to do all this, and while it has been very fun, time is not something I have an excess of. I will always craft and I will still post, but not on a regular basis. Please "Follow" me to be kept in the know on the blog.

Thanks to all the followers and those that regularly read my blog. I Can't tell you how gratifying it has been so far and I hope to not lose too many of you.

Monday, February 14, 2011

Link Party Monday

You know the drill. Link to something that is your own work of awesomeness, new or old doesn't matter as long as it's yours. Link to the specific post not just your general blog. Then, grab that button on the left and let the whole world know you were seen on Backstitch Baby! :)


Friday, February 11, 2011

Fabric Stained Glass: Faux Stained Glass Wall Hanging

Another project for my Pay it Forward 2011. I love the beautiful Faux Stained Glass Wall Hangings I've seen. My mother has made some beautiful ones the "right" way with the black bias tape leading and everything.

For my first attempt, I thought I would try a pot holder size and I knew just the picture I wanted.


Luckily, I found this great instructional video from Details By Diane. She make is to easy!


1.) So. First things first. I found a free stained glass pattern online (if you would like to make a regular size wall hanging Diane sells patterns on her website). Then I traced my pieces onto the fusible backing.


2.) I cut out the pieces and ironed them onto the fabric. **Hint: If you trace the pieces that will be the same color all in one group you can save time by cutting around the whole group instead of the individual pieces.


3.) Arrange the pieces on the Black Background.


4.) When everything is where it should be peel off the backing paper and iron them down.


5.) For this particular pattern, I cut around the circle and cut a back fabric and batting. I also made a small tube for a hanging loop.


6.) Pin the layers as follows: Batting, then Backing Right-Side Up, then the Stained Glass piece Right-Side Down. Curve the tube and tuck it in between the backing fabric and the stained glass piece, matching the edges.


7.) Stitch around the edge leaving an opening for turning.


8.) Turn right-side out and press.


I know just who I will give this to! It's so fun and easy, you really should make one for yourself.

Wednesday, February 9, 2011

Jewelry Making: Pistachio Shell Necklace

The reason I started this blog is not just my love of crafting, but because I was so inspired by others. Adventures in Dressmaking, NewDressADay, and Aunt Peaches challenged my thinking and how I look at the materials I have on hand. Aunt Peaches especially made me take a second look at things I found pretty and think of ways to use them.

One such item was Pistachio Shells.


I'm not sure why I love these little things. Maybe it's their sea shell appearance, or their smooth texture... either way I had to figure out a way  to use them.

I got an idea...

First I spray painted them a coral pink color.


Then, with my handy-dandy tools, I drilled holes in a few.


I assembled jewelry making supplies such as: Silver Chain, Pearl Beaded Chain, Accents, and Jump Rings (the little connector circles).


To start the necklace, I took two 25 in. strands of the silver chain and joined them with a jump ring.


I then hooked more jump rings through the shells and connected them to one of the chains.


The same process saw the accent leaves attached.


Then the Pearl Beaded Strand (it came to about 18 inches).


I also found a small flower buttonhole cover and decided to attach that as well, and with that, I have a lovely new necklace.


I really like how the shells remind me of flower petals.

I made two of these necklaces for something called "Pay it Forward 2011". A friend of mine on Facebook posted it as her status early this year, and the terms were the first 5 to comment would receive something homemade but in return they must each post it as their status. So two homemade items down, three to go.

I highly recommend doing this if you haven't already. It's a lot of fun and a great way to stay connected with friends and family.

Tuesday, February 8, 2011

Link Party Favorites: The Crafty Scientist and Suzy's Artsy Craftsy Sitcom

I'm sorry this blog is getting out late today. There was a difficulty in getting online, but all's well now.

I really liked all the crafts from yesterday's link party, but I must say Suzy's Faux Inlay project rocked my socks. I love, love, love old wooden furniture and that was a great way to spruce up a side table!


The printable from Mel ,The Crafty Scientist was perfect for Valentine's Day. I thought this would make a cute tee shirt.

***Important: When printing something out on Iron-On Transfer Paper, remember to flip the image in editing software so that the words are not backwards when you iron it on. (Not that I've made that mistake or anything...)


Thank you everyone that participated!  Angi, at Creative Bliss, keeps things organized on her pretty Dry-Erase Menu Board. Jenna shared her easy cosmetic case with us at SewHappyGeek@Excell Crafts.

The link party is slowly but surely growing and I intend to keep it going so more and more people can join in the fun. Tomorrow, making a necklace using an unusual material.

Sunday, February 6, 2011

Link Party Monday

Alas, Linky Tools has decided to start charging for all their services. What's more, if you don't pay for a subscription, your account with them gets deleted starting today. BUT, never fear! Thanks to Inlinkz from BlogHer, the Link Party continues!

The rules are the same:
  • Post as many links as you want but it needs to be your own work.
  • Doesn't have to be sewn  or a traditional craft (could be painting, sketch, upholstering, etc).
  • Please link to the individual post and not just your general blog.

I'll post my favorite(s) tomorrow. Later this week, making a necklace and stained glass sewing.

Don't forget to grab the button on the left to let everyone know where your awesome work is being displayed!


Thursday, February 3, 2011

Friday Inspiration

   I love looking around in the blogosphere for the happy-haps on crafts.

Check out this gorgeous Round Robin Quilt from Suzy's Artsy Craftsy Sitcom:


There is nowhere better to get your funk on than with Aunt Peaches...


and there's her less Funky still Fab Wax Doily Valentines too...


Along those Valentine lines is the cute Heart Necklaces from Tatertots & Jello


Of course it doesn't have to be a craft to be inspiring. I love Alisa Burke's Peeks Into Her Sketchbook
I love how she fills in the background or borders with descriptions and thoughts.

And if you love vintage fashion you MUST check out Casey's Elegant Musings. Her photography is great, too.


So how about you? What did you find inspirational this week?

Valentine's Day From-The-Heart Pillow


If you have wanted to pick up quilting, but would like to try a smaller project first, or maybe you are looking for a beginner's project... a pillow is a great place to start. It makes a quick and easy gift, and perfect for a young sewer, too!

You Will Need:

  • Scraps of fabric
  • Craft Stuffing or a Small Pillow Form

Cut:
2 Rectangles of the Heart Fabric: 3.5in x 6.5in
4 Squares of the Neutral (white) Fabric 2in x 2in
2 Squares of Neutral Fabric 3.5in x 3.5in
2 Strips of Neutral 2in x 6.5in
2 Strips of Neutral 2in. x 9in
2 Strips of the Accent (floral) Fabric 2in x 9in
2 Strips of Accent 2in x 13.5
1 Square of Accent 13.25in x 13.25in


1.) Using the Rectangle of Heart Fabric, and one 2 x 2 Neutral Square, sew the square in the corner on the diagonal.


Cut one quarter of an inch away from the stitching taking the corner off, and press open.

Repeat this step with the opposite corner. Do the same for the second Heart Rectangle.


2.) Sew the 3.5in Neutral Square onto the Lower-Right corner of one piece and the other onto the Lower-Left of the second piece. Sew as you did the smaller squares, cutting off the corner and pressing out.


3.) Matching the seams, sew the two halves together and press.


***IMPORTANT STEP: Use your rotary cutter to trim/even out these edges. As you will see in the next step I didn't do this, and it throws off the whole center.


4.) Sew the two short Accent strips to the top and the bottom of your block and press.


5.) Sew the long pieces to the sides. Press, and even the edges.
See that crooked center? Yep. That's what happens when I don't even the edges.

6.) Do the same with the neutral strips.


7.) Right-sides together, sew the block to the 13in x 13in square, leaving a section open for stuffing.


8.) Turn right-side out and stuff, then stitch the opening closed.


What a cute holiday accent and a great way to begin a love of sewing!

Wednesday, February 2, 2011

Quilted Valentine's Day Card


Everyone hunkering down for the blizzard? We've got plenty of snow so far in Michigan...my front steps are somewhere under the drifts. Bright side? Snowy Day = Perfect time for a quick craft!

When I wanted to do something special for my kids on Valentine's Day, I stumbled upon the idea for Quilted Postcards online. I thought this was one of those projects a little like coloring... quick, easy, and really let you relax in some creativity. (I was right.)

To make your own Quilted Valentines, you will need a few scraps of fabric and batting (you could use some stabilizer or extra fabric if you don't have batting).


1.) Cut 2 pieces of fabric and one piece of batting into 4in. x 6in. pieces, plus a heart. If you're making one for Grandma, why not print a picture of the Grandkids onto one of the fabric pieces?


2.) Now you must decide on your design.

*Option 1*If you want the back fabric (where you will write) without stitching, you will need to do your quilting and attach the heart with just the top fabric and batting together. This was how I did the Valentines in the first picture.

For this tutorial, I want the quilting to be an accent on the back. So I...

*Option 2* ...sandwiched the batting between the top and backing fabric, and sewed them together around the edge. If you have a serger this would be a great time to use it. Myself, I just zigzag. (This would be the last step if you're going with the first option.)


3.) Sew your quilting lines on the sewing machine.


4.) Attach your heart and stitch the edges down with a zigzag.


5.) Add your message.


I'd like to add a page just for pictures of your own versions of my tutorials. So please feel free to email those pics!